the Creative Commons Attribution 4.0 License.
the Creative Commons Attribution 4.0 License.
Precise linear measurements using a calibrated reference workpiece without temperature measurements
Rainer Tutsch
We suggest a procedure for the correction of the errors caused by thermal expansion of a workpiece and the scale of a linear measuring instrument (coordinate measuring machines, length measuring machines, etc.) when linear measurements are performed at nonstandard temperature. We use a calibrated reference workpiece but do not require temperature measurements. An estimation of the measurement uncertainty and application examples are given.
- Article
(803 KB) - Full-text XML
- BibTeX
- EndNote
Quality control loops in today's production in most cases rely on the measurement of geometrical quantities. One problem that might arise is that geometrical properties are specified at 20 ∘C, the so-called normal temperature (ISO 1:2016-12, 2016). In practice, the temperature in a workshop or a production line will not be adjusted to normal temperature but undergo considerable fluctuations due to various factors which need to be studied and taken into account (Baldo and Donatelli, 2012). Measurement values of geometrical parameters taken at non-normal temperature will be erroneous due to thermal expansion of the material (ISO/TR 16015:2003, 2003).
As a solution, production sites have to be equipped with measuring chambers with specified and controlled equipment. Besides the high maintenance costs of these measurement areas it takes time to bring the manufactured workpieces (WPs) there and to get the required temperature balance between the measuring instrument and the parts to be measured (ISO 15530-3:2011, 2011). Control loops will thus become slow and changing influence factors might therefore cause a certain number of workpieces to be produced out of tolerance before the process can be stabilized again.
Nowadays, the temperature compensation problem is usually solved by a detailed study of the metrological properties of the applied measuring instrument in particular, the whole measuring process in general and hence by a correction of errors due to these properties. This is performed either indirectly – using an “ideal workpiece” that does not change its geometrical properties due to temperature changes to make a comparison of “what we expect” (nominal values) with “what we have” (measured values) (Baldo and Donatelli, 2012; Ohnishi et al., 2010) or directly – when a straight analysis of “what we have” is made (to discover possible factors that might have affected the measured results and therefore to exclude or minimize them) (Chenyang et al., 2011; Kruth et al., 2001). Despite these two approaches being different according to the principles lying behind them, they have something in common. They all require highly qualified personnel to carry out all the tests and measuring temperature of all involved objects (even in the case of using some ideal workpiece, the temperature of the measuring instrument has to be determined).
Some precise complex measuring instruments like coordinate measuring machines (CMMs) are equipped with thermal sensors for detecting temperature from both its linear scales and the object to be measured. That will allow these measuring instruments to estimate the length of the object reduced to a temperature of 20 ∘C. Manufacturers are expected to have enough funds for all required (the described above) equipment to provide all necessary studies. However, in spite of the potential availability of advanced technologies able to provide automatic temperature compensation, they are not always affordable. This might lead to a bigger uncertainty contribution during production processes and post-production control. As an example, in Ukraine (where the author Dmytro Sumin was born and raised) this is often the case when companies try to provide some small production activity using obsolete (sometimes dozens of years old) but cheap equipment.
In this research work a method is described which would allow companies like these to have an affordable alternative to the expensive equipment, which at the same time is comparably effective. The authors accept the challenge to perform length measurements under non-normal temperature by using calibrated reference workpieces (RWPs, therefore using the indirect approach) but without a seemingly inevitable necessity to measure temperature, neither of the objects to be measured nor of the measuring instrument. In Sect. 2 the procedure for correction of thermal expansion of a workpiece without knowledge of the temperature by referring to a calibrated reference workpiece is introduced. In Sect. 3 the uncertainty of the measurements is estimated and in Sect. 4 application examples are given.
Thermal expansion is characterized with the coefficient of thermal expansion (CTE) (ISO/TR 16015:2003, 2003):
where Δl is the absolute length expansion of a body at the temperature range Δt and lst is the length at standard temperature.
Using Eq. (1), Δl can be calculated as
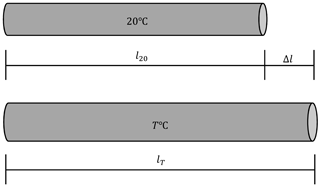
Taking into account Eq. (2) the length lT (see Fig. 1) of a body at its temperature can be estimated:
where l20 is the length of the body at 20 ∘C.
Equation (2) is a mathematical model of thermal expansion of an object. It is a linear function. So the value of Δl is proportional to the active parameter Δt.
The nominal length of the produced workpiece is defined at the standard temperature 20 ∘C. If the measurement is executed at a different temperature Δtwp, the workpiece has the actual length that is related to the length value at , described by the following equation:
where αwp is the CTE of the workpiece and the value is the characterization of the absolute expansion of the workpiece.
The main problem of this formula is that Δtwp and must be known first. To estimate them a thermometer and a calliper, for example, can be used. But the calliper is also a material object, with a scale that has some CTE αsc and at the temperature difference value Δtsc its length is . Also, equality of corresponding parameters should not be expected, so it is assumed that Δtwp≠Δtsc and αwp≠αsc.
where the value ( characterizes the absolute expansion of the scale.
The actual value of the workpiece's length is unknown and instead of it its measured (estimated) value lwp will be operated with. Obviously, this value (as well as ) relates to the absolute expansion of the workpiece. However, because it is measured (estimated) using the scale, it is also related to the absolute expansion of the scale. For better understanding of how this relation works and how it affects the results of measurements, two special cases will be considered.
- a.
Changing temperature of the workpiece with constant temperature of the scale:
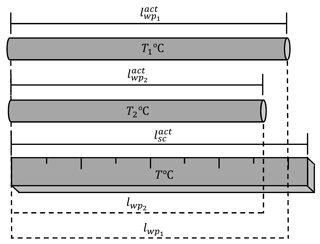
In Fig. 2 it can be seen that the workpiece initially had the temperature T1 ∘C, thus its actual length was , then its temperature became T2 ∘C (and the length ), whereas the scale had the same temperature T ∘C (the length ) in both cases.
Estimated values and (the readings from the scale) showed themselves to be directly proportional to the parameters and correspondingly: an increment of leads to an increment of lwp:
- b.
Changing temperature of the scale with constant temperature of the workpiece:
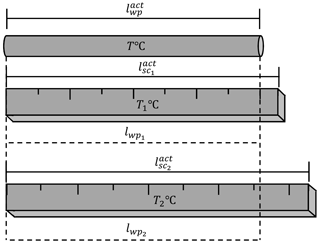
In Fig. 3 it is seen that the workpiece had the constant temperature T ∘C (and the length ), whereas the scale initially had the temperature T1 ∘C (the length ), then its temperature became T2 ∘C (the length ).
Estimated values and showed themselves to be inversely proportional to the parameters and correspondingly: an increment of leads to a decrement of lwp:
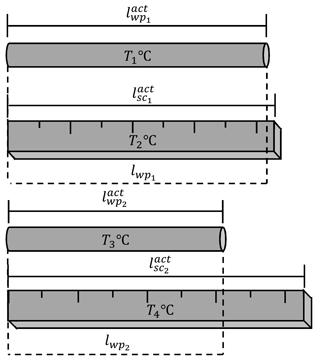
In real life changing of both parameters and at the same time (see Fig. 4) is mostly the case.
The workpiece had the temperature T1 ∘C (the length ) and the scale had the temperature T2 ∘C (the length ), then they both changed their temperatures to the values T3 ∘C (the length ) and T4 ∘C (the length ) correspondingly. The way that the parameter lwp relates to the parameters and is already known from Eqs. (6) and (7), so taking these into account, a new proportion can be derived:
If we assume all parameters with subscript “1” (the left side of Eq. 8) to have been achieved at Δtwp=0 K and Δtsc=0 K, according to Eqs. (4) and (5), it can be stated that
For further calculations it will be assumed that l20 sc=l20 wp (the scale is expected not to be deformed by temperature effects at Δtsc=0 K). After transformation of Eq. (9), l20 wp can be found as follows:
or
where is the temperature of the scale during measurements of lwp.
It is clearly seen that in the case of equality of absolute expansion characterization values of the workpiece and the scale () even if and αwp≠αsc, the temperature effect is cancelled and the desired value l20 wp therefore can be achieved without any additional action. However, such an instance is a rare case. To use Eq. (10) we should figure out each of these four unknown parameters: αwp, αsc, Δtwp and . Even if a thermometer was used so that Δtwp and could be found, the CTEs nevertheless may not be calculated directly, but only achieved after a series of measurements (Amatuni, 1972).
Analyzing Eq. (10), it can be discovered that lwp and l20 wp are related to each other through a term which contains all four unknown parameters. This means that if a checked workpiece were used as the reference standard (ISO/TR 16015:2003, 2003; ISO 15530-3:2011, 2011) (a so-called reference workpiece), Eq. (10) would be as follows:
where lrwp and l20 rwp are the length of the reference workpiece at Δtrwp≠0 K and Δtrwp=0 K correspondingly, is the temperature difference at the scale during measurements of lrwp, αrwp is the CTE of the reference workpiece and αsc remains unchanged as we are using the same measuring instrument.
Now it is necessary to check these workpieces using the same measuring instrument as a comparator (ISO/TR 16015:2003, 2003). If the reference workpiece's CTE and its temperature were αrwp=αwp and Δtrwp=Δtwp correspondingly and the temperature of the scale during the reference workpiece measurements were (assuming that all objects' temperature distribution is uniform), it would be able to decrease the number of four unknown parameters to only one, combining Eqs. (10) and (11) to a proportion
Only l20 rwp is now needed. As long as the value l20 rwp is measured at 20 ∘C in a laboratory and provided to us, Eq. (12) will not have any unknown parameters (out of the four stated above) anymore.
The desired value l20 wp in this case could be found as
Using the reference workpiece according to Eq. (13), we can find out l20 wp for any other workpiece of the same type (with the same desired geometrical parameter) without knowing αwp, αsc, twp and . The components lwp and lrwp in Eq. (13) are estimated (not actual!) values achieved using the scale of a measuring instrument. Because usually the scale's CTE has a nonzero value and expands too, the differences l rwp−l20 rwp and l wp−l20 wp show the so-called relative expansion of the workpiece compared to the scale which will be smaller than the expected absolute expansion of the workpiece (e.g., in Eq. 4).
It is assumed that three of the four corresponding parameters are equal: αrwp=αwp, Δtrwp=Δtwp and (αsc=const). But, it is clear, that in real life they never are; even CTEs of two different objects made from one material may be slightly different. Also, despite the fact that it is required that the reference workpiece and the workpiece to be measured are similar (within certain tolerances) (ISO 15530-3:2011, 2011), there might be some difference between geometrical and physical properties of the workpiece and the reference workpiece.
Using Eqs. (10), (11) and (13) without making simplifying assumptions, it can be stated that
where and are the temperature differences at the scale during measurements of lwp and lrwp.
Uncertainty of the measurements can be estimated using Eq. (14) as a mathematical model of measurements (JCGM 100:2008, 2008). After a series of transformations it will look like
In Eq. (15) and at any natural conditions, so the formula can be shown as
Defining , , and , Eq. (16) can be shown as
The differences , , δtwp and δαwp (but not their uncertainties) are estimated to be zero. The values l20 rwp, lwp, lrwp, Δtrwp, αrwp and αsc are assumed to be uncorrelated. Taking this into account, the combined standard uncertainty can be expressed as
where the sensitivity factors are
and
Uncertainty of the calibration of the reference workpiece u(l20 rwp) should be taken from the calibration certificate, which states the value and uncertainty of l20 rwp for the reference workpiece.
The uncertainties of the measured lengths u(lwp), u(lrwp) and temperature difference u(Δtrwp) could be calculated as a standard uncertainty of type A and/or type B after the values lwp, lrwp and Δtrwp were measured by corresponding measurement instruments.
Uncertainty of the reference workpiece's thermal expansion coefficient u(αrwp) should be taken from the calibration certificate, which states the value and uncertainty of αrwp for the reference workpiece. The uncertainty for the values l20 rwp and αrwp (as well as the values themselves) is provided in the same certificate (a CTE investigation should be specifically carried out for the given object prior to the method application).
Regardless of what the value of c(αsc) in Eq. (24) is, it was decided to use the same measuring instrument for defining lengths of the reference workpiece and the workpiece, so αsc itself can not (or, at least, should not) affect values lrwp and lwp, and so it will be assumed that c(αsc)=0 (it is estimated that the CTE of the scale αsc remains the same during our measurement session). Thus, the standard uncertainty u(δαsc) (whatever its value is) can be neglected.
The uncertainties of the differences of temperature , , u(δtwp) and the difference of CTEs u(δαwp) should be considered specifically for the circumstances according to which the values , , δtwp and δαwp were assumed.
Expanded uncertainty Up with a level of confidence p and coverage factor kp can be calculated using Eq. (18) as follows:
The final estimation of the value of l20 wp therefore can be expressed as
The uncertainty of measuring humidity and atmospheric pressure was neglected, as α=f(t) (Amatuni, 1972).
All given formulae are well known and used here as an adaptation for a specific task solution.
4.1 Example 1
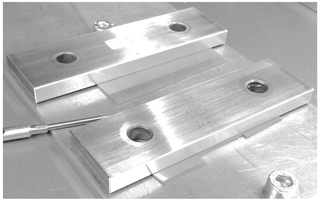
There are two gauge blocks calibrated beforehand which will be used as the WP to be measured using a CMM and the RWP (shown in Fig. 5). The task is to determine the length of a WP (as if it were unknown) at the normal temperature l20 wp, evaluate the uncertainty of measurements and compare calculated results with actual ones.
The RWP's properties are known; its length at normal temperature and the CTE are l20 rwp= 125.0000 mm ± 0.0002 mm and , respectively.
Measurements which have been carried out assuming that αrwp=αwp give the following values of length of RWP and WP at a current temperature lrwp=125.0043 mm and lwp=125.0048 mm.
Using Eq. (13) the desired value can be calculated:
In this way, the first step of the task is done – l20 wp is known. Now, all possible uncertainty factors must be considered.
Evaluation of the uncertainty will be done in three steps:
-
calculation of sensitivity factors c(xi),
-
consideration of standard uncertainty values u(xi),
-
calculation of combined standard uncertainty uc(f(x)) and expanded uncertainty Up.
Before starting this procedure, we will summarize all known arguments and assume all unknown arguments of the function
where l20 wp=125.0005 mm, l20 rwp=125.0000 mm, lwp=125.0048 mm, lrwp= 125.0043 mm, Δtrwp=15 K, , and .
If the parameter αsc is unknown it can be estimated as any reasonable value; in this very instance it is provided though.
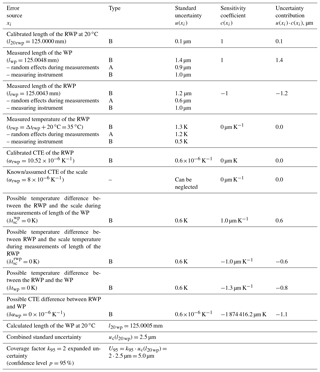
The calibration certificate gives the expanded uncertainty of the l20 rwp U95=0.0002 mm with coverage factor k=2. The standard uncertainty is then
The value lwp is achieved as a mean value of five measurements. The standard uncertainty of the measured value can be calculated as a type A standard uncertainty:
According to the calibration certificate of the measuring instrument, the expanded uncertainty of measurements with it is given as a distribution range µm, where L (in mm) is the nominal size of the object to be measured, and because the actual value can be anywhere within this range at equal probability, a rectangular law of a random value distribution is to be considered. The standard uncertainty due to a random error of the measuring instrument (mi) is then
The standard uncertainty for the lwp will be
The standard uncertainty for the value lrwp can be calculated similarly as for the lwp:
The reported environmental temperature was ∼35 ∘C. The temperature at the time of measurements was not recorded. By this, it is assumed that Δtrwp=15 K (trwp=35 ∘C), and because the RWP, WP and the measuring instrument were in the same chamber, all temperature differences , and δtwp are estimated to be zero. The measurements took around 20 min during which the environmental temperature might have changed by ±2 K. So, taking into account the conditions described above and the expanded uncertainty of the thermometer, which was used for environmental temperature measurements U95=1.0 K (k=2), it is possible to estimate the standard uncertainty as follows:
The calibration certificate gives the value of the αrwp with the distribution range , and because actual value can be anywhere within this range at equal probability, a rectangular law of a random value distribution is to be considered. The standard uncertainty is then
As was said before, the temperatures of the RWP, WP and the measuring instrument are expected to be equal, but the differences , and δtwp should be within the estimated range ±1.0 K. The standard uncertainty is
Similarly to the speculations regarding αrwp, the difference δαwp is estimated to be within the range . The standard uncertainty is then
Now it is possible to express the combined standard uncertainty according to Eq. (18):
The crucial contributors here are the values of lwp, lrwp and δαwp – each of them contributed ≥1 µm. These major contributors in the example are the sources of the uncertainty that come from the measuring instrument and the difference between CTEs of the objects to be measured. So, more accurate and precise results can be obtained using a measuring instrument with a lower uncertainty of measurements and workpieces made of the same material.
Therefore,
Using Eqs. (29) and (30), we can express the final value at the level of confidence p=95%:
All calculated results according to Eqs. (18)–(28) are shown in Table 1.
The properties of the WP according to the calibration certificate are and (the gauge blocks are from different manufacturers). Now, the En criterion (Wöger, 1999) can be applied to check if the calculated value is compatible with the value given in the certificate (JCGM 200:2012, 2012):
where ldet is the measured result and lref is the reference value that compatibility is to be checked with. The values Udet and Uref are their expanded uncertainties correspondingly.
Compatibility is considered to be confirmed if |En|≤1.
In this example ldet and Udet are the values that were determined during the measurements and uncertainty evaluation. The values lref and Uref are given in the certificate. Therefore ldet=125.0005 mm, Udet=0.0050 mm, lref=124.9968 mm and Uref=0.0002 mm. Applying Eq. (31), the criterion is
Technically, the compatibility is confirmed (|En|≤1); however, the achieved criterion is very close to its boundary value (at which the compatibility is disproved). Is there any way to make the measured result ldet more reliable? As was stated above, in this example the main uncertainty contributors are lwp, lrwp and δαwp. The first two are due to the measuring instrument and cannot be dramatically affected (unless the measuring instrument is changed for a better one), whereas the last is up to the material of the workpieces to be measured so that it can be greatly reduced.
4.2 Example 2
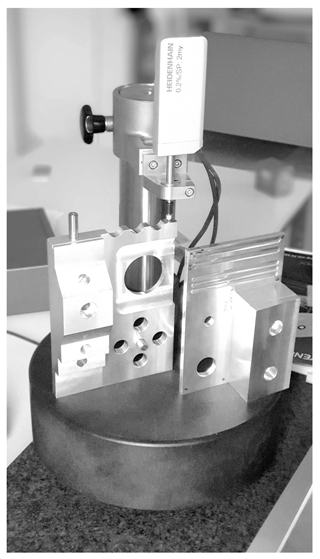
For this example, two actual workpieces are used. They are made of the same material, so now it is known that their CTEs should be completely the same (αrwp=αwp). However the workpieces have different shape and length (along the measurement axis). Despite the fact that the workpieces had not been officially calibrated, they were both measured using the CMM at 20 ∘C multiple times with the uncertainty estimation beforehand so that their geometrical parameters were known and could be checked. The measurements will be made using a length gauge (see Fig. 6).
The RWP has the following properties: and .
Measurements that have been carried out give the following values of length of RWP and WP at a current temperature: lrwp= 160.0418 mm and lwp= 150.0015 mm.
Using Eq. (13), the desired value can be calculated
Similar to the first example, we will summarize all known arguments and assume all unknown arguments: l20 wp=149.9635 mm, l20 rwp=160.0013 mm, lwp=150.0015 mm, lrwp= 160.0418 mm, Δtrwp=23.5 K, , , and .
In this example the parameter αsc according to the measuring instrument's manual should be close to zero (made of Zerodur). However, the instrument is mounted on a steel stand which has some nonzero CTE. So the stand's CTE (a table value for steel) was taken as the scale's CTE.
The uncertainty of the l20 rwp U95=0.0020 mm with coverage factor k=2. The standard uncertainty is then
The value lwp is achieved as a mean value of six measurements. The standard uncertainty of the measured value can be calculated as a type A standard uncertainty:
The calibration certificate for the measuring instrument is not available; the manual states the accuracy of the device to be ±0.2 µm, which we will use as the expanded uncertainty of measurements, and because the actual value can be anywhere within this range at equal probability, a rectangular law of a random value distribution is to be considered. The standard uncertainty due to a random error of the measuring instrument is then
The standard uncertainty for the lwp will be
The standard uncertainty for the value lrwp can be calculated similarly as for the lwp:
The measured environmental temperature was 43–44 ∘C. The temperature at the time of measurements was not recorded. In this way, it is assumed that Δtrwp=23.5 K (trwp=43.5 ∘C), and because the RWP, WP and the measuring instrument were in the same chamber, all temperature differences, , and δtwp, are estimated to be zero. The measurements took around 10 min during which the environmental temperature might have changed by ±1 K. So, taking into account the conditions described above and the expanded uncertainty of the thermometer, which was used for the environmental temperature measurements U95=0.1 K (k=2), it is possible to estimate the standard uncertainty as following
The manufacturer of the aluminium billet (the one that the workpieces are made of) only states the value of the CTE itself without any distribution range; that is why a typical range of is assumed. Because the actual value can be anywhere within this range at equal probability, a rectangular law of a random value distribution is to be considered. The standard uncertainty is then
The temperatures of the RWP, WP and the measuring instrument are expected to be equal, but the differences , and δtwp should be within the estimated range ± 0.5 K. The standard uncertainty is
The difference δαwp is estimated to be . The standard uncertainty is then
Now it is possible to express the combined standard uncertainty according to Eq. (18):
In this example crucial contributors are only the values of l20 rwp and δtwp – each of them contributed ∼1 µm. This means that using a measuring instrument that is even more precise is not profitable. Technically speaking, better accuracy in this case is hardly possible; one of the contributors depends on the accuracy of the RWP's calibration (which is already expected to be higher), and the other on the way that the environmental temperature is distributed. Example 2 shows that the equality of the workpiece's CTEs is much more important than the equality of the geometrical properties.
Therefore,
Using Eqs. (29) and (30), we can express the final value at the level of confidence p=95%:
All calculated results are shown in Table 2.
The established length of the WP using precise measurements is . So, for this example, according to Eq. (31):
Here, compatibility is also confirmed. But, in this example, due to a lesser value of En, reliability of the determined value ldet (the probability that ldet and lref are really compatible) is higher.
The En criterion is unfortunately inapplicable for the real measurements as the value lref is usually not known. However, the uncertainty contributors' analysis (which for both examples was performed after calculation of the combined standard uncertainty according to Eq. 18) can give enough information about the compatibility of the determined value with some unknown reference value.
Note that all calculations for examples 1 and 2 were performed using MS Excel. Due to a higher accuracy, some of the results might be negligibly different than if they had been obtained using a conventional calculator. The final errors were rounded up (e.g., 2.401 to 2.5 µm).
The suggested method does not provide a level of accuracy reachable with methods which require temperature measurements; however, it is universal (can be applied to any linear measuring instrument without any hardware modifications), it does not slow down the measuring process for temperature stabilization (does not create a so-called bottleneck at the production conveyor) and it can be used by a measuring instrument's operator without additional qualification training. The method can be applicable in production areas where no submicron accuracy is required.
The best results are achievable with shortening of the measurements' duration (so the temperature does not change significantly) and the RWP should at least be made of a similar material to the WP. During the measurements, draughts and proximity to warming sources should be avoided (to prevent inequality in the temperature distribution for the RWP and the WP under test).
No data sets were used in this article.
DS has developed the correction algorithm and derived the uncertainty estimation as a part of his thesis work. RT has initiated the project of correction of thermal expansion by reference to calibrated workpieces and is supervising the thesis work.
Author Rainer Tutsch is a member of the editorial board of the journal. Role of the funding source: the authors declare that they do not have any personal or other forms of material interest and no subsequent potential conflicts existing in the presented research work.
The author Dmytro Sumin gratefully acknowledges the funding of his scholarship by the Federal Ministry for Economic Cooperation and Development of Germany and
support of the Braunschweig International Graduate School of Metrology
B-IGSM.
Edited by: Rosario Morello
Reviewed by: two anonymous referees
Amatuni, A.: Methods and Apparatus for Determining the Coefficients of Linear Thermal Expansion of Materials, Izd. Standartov, 1972 (this translation was provided as the name of the reference source no. 1 in https://doi.org/10.1007/s11018-016-0897-1, in Russian).
Baldo, C. R. and Donatelli, G. D.: Experimental analysis of industrial coordinate measuring systems using a calibrated production workpiece. XX IMEKO World Congress Metrology for Green Growth, Busan, Republic of Korea, 2012.
Chenyang, Z., Cheng, C., and Hang, Z.: Study on nonlinear thermal error of the measurement machine, ICEMI'2011, 2011.
ISO 1:2016-12: Geometrical product specifications (GPS) – Standard reference temperature for the specification of geometrical and dimensional properties, 2016.
ISO 15530-3:2011: Geometrical product specifications (GPS) – Coordinate measuring machines (CMM): Technique for determining the uncertainty of measurement – Part 3: Use of calibrated workpieces or measurement standards, 2011.
ISO/TR 16015:2003 (en): Geometrical product specifications (GPS) – Systematic errors and contributions to measurement uncertainty of length measurement due to thermal influences, 2003.
JCGM 100:2008: Evaluation of measurement data – Guide to the expression of uncertainty in measurement, JCGM 2008, 2008.
JCGM 200:2012: International vocabulary of metrology – Basic and general concepts and associated terms (VIM), JCGM 2012, 2012
Kruth, J.-P., Vanherck, P., and Van den Bergh, C.: Compensation of static and transient thermal errors on CMMs, Annals of the CIRP 50/1, 2001.
Ohnishi, T., Takase, S., and Takamasu, K.: Study on improvement methods of CMM (coordinate measuring machine) in workshop environment – evaluation of temperature correction using low-expansion gauge-block, Journal of the Japan Society for Precision Engineering, 76, 541–545, https://doi.org/10.2493/jjspe.76.541, 2010.
Wöger, W.: Remarks on the En-Criterion Used in Measurement Comparisons, PTB-Mitteilungen 109 1/99, 1999.


