the Creative Commons Attribution 4.0 License.
the Creative Commons Attribution 4.0 License.
Determination of the single point precision associated with tactile gear measurements in scanning mode
Andreas Michael Müller
Tino Hausotte
The framework of the single point uncertainty developed at the Institute of Manufacturing Metrology (FMT) presents a methodology to determine and evaluate the local measurement uncertainty for a measurement setup by local comparison of a measurement series with an associated reference geometry. This approach, which was originally developed and optimized for the processing of complete areal measurements of work pieces using industrial X-ray computed tomography, was now also extended to line scans found in dimensional testing using tactile coordinate measuring machines (CMMs). The targets of the investigation are spur (involute) steel gear wheels, which can be dimensionally characterized by both helix and profile scans using a CMM in scanning mode in combination with a rotatory table. A second measurement procedure is characterized by a single scan of the complete gear profile without the usage of a rotatory table, using the “free-form scan” CMM functionality. The modification of the single point uncertainty framework in order to determine the single point precision of repeated gear wheel measurements was implemented successfully for gear measurements using the Zeiss Gear Pro evaluation software in combination with a rotatory table as well as unassisted free-form scans of the same gear. The examinations yielded abnormally high random measurement errors, which could not fully be explained within our examinations and was for the most part caused by the accuracy of the used rotatory table of the CMM. The alternative measurement method showed that the CMM system is capable of measuring very precisely in scanning mode if the changes in the curvature of the scan trajectory are favourable.
- Article
(5554 KB) - Full-text XML
- BibTeX
- EndNote
The framework of the single point uncertainty describes a methodology to statistically evaluate the local measurement uncertainty of a measurement series consisting of n repeated single measurements with respect to an associated reference geometry in the sense of the International Vocabulary of Metrology (VIM) (Brinkmann, 2012). Usually, a geometric registration routine is required to geometrically align the single measurements with the reference geometry. The surface data are represented by triangle meshes using the STL file format. Originating from homogeneously distributed surface points on the reference surface (also called sampling points), the distances to each single measured surface are calculated. Depending on the sampling strategy applied, slightly different distances are computed (Müller and Hausotte, 2019a). Finally, each sampling point is associated with n calculated distances (one for each measurement repetition). For each of those sets of distances, the mean value as well as the standard deviation can be computed. In case a reference geometry is actually available, the combination of the hereby calculated local systematic measurement error and the local random measurement error represents the single point (measurement) uncertainty. In case no reference measurement exists, the nominal geometry of the work piece can be used. In that case, the mean distance value represents the combination of the systematic error and the work piece deviations, and both effects cannot be separated. Nonetheless, the distribution of random measurement errors (also called measurement precision) of the measurement setup can be determined. The exact knowledge of the single point uncertainty of a measurement setup result can greatly influence the quality of the subsequent measurement data evaluations. The processing of single point precision data as weighting factors in geometry element fitting routines can lead to a more accurate determination of geometry element parameters (Müller and Hausotte, 2019b). For industrial computed tomography (CT), the visual evaluation of the locally varying uncertainties gives direct insight into the underlying X-ray penetration lengths. This is because they directly affect the single point noise due to the impaired signal-to-noise properties of the recorded projections. The method was successfully used to correct systematic measurement errors in CT measurements by determining the systematic single point errors of a simulated measurement series and subsequently correcting these systematic measurement deviations (Müller et al., 2018). The core routine used in this former work at the Institute of Manufacturing Metrology (FMT) provided accurate results under most conditions (Fleßner et al., 2016). This algorithm computes the distance from each sampling point of the reference/nominal geometry in the direction of the vertex normal vectors of these sampling points to the triangulated measurement geometry. This sampling strategy is called normal vector (Fig. 1). If a measured coordinate is trustworthy, the same applies for the normal vector of the nominal geometry and thus defines the direction in which the corresponding point on a measurement surface is most likely expected. Mathematically, this problem is described by a ray–triangle intersection test, which is a well-known problem in the field of computer graphics (Glassner, 2007; Suffern, 2007; Shirley and Morley, 2003; Möller and Trumbore, 1997; Schlick and Subrenat, 1995). Subsequent development efforts resulted in the introduction of an alternative sampling strategy, which solved the problematic sampling of edge regions associated with the sampling in the direction of the surface normal vector (Müller and Hausotte, 2019a). This sampling strategy calculates the shortest distance from a sampling point to the target surface and is therefore called shortest distance (Fig. 1). Additionally, this sampling exhibits superior run time properties compared to the existing ray-tracing solution. Despite superior performance characteristics it rarely makes sense to use the third sampling strategy, nearest neighbour (Fig. 1), because of the high dependence on the stability of the point cloud density. The determination of the single point uncertainty makes it then possible to pass information about the measurement uncertainty to complex extended tolerance analysis methods and therefore consider the uncertainty inherently associated with any measurement (Müller et al., 2019b). So far, we have only determined and evaluated the single point uncertainties for measurement systems producing an areal measurement result represented as triangle meshes. These are mainly CT and structured-light scanning (Müller et al., 2019a).
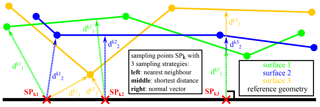
Figure 1Visualization of the different sampling strategies nearest neighbour (left), shortest distance (middle) and normal vector (right) (Müller and Hausotte, 2019a).
This contribution presents various suitable adjustments to the single point uncertainty framework in order to also be able to process line scans from coordinate measuring machines (CMMs) using the example of gear wheel measurements. Because of the fact that no reference measurements with a lower measurement uncertainty were available for the used CMM, only the single point precision was determined using the nominal geometry (CAD – computer-aided design) as the sampling start geometry. The complex geometrical inspection of gear wheels ensures the transferability of the approach to easier measurement setups. The gear measurement using Zeiss Gear Pro in combination with a rotatory table and the CMM – scanning mode is compared against a gear measurement using a single free-form scan capturing the complete gear profile. Additionally, the precision of the used rotatory table is evaluated, because it was identified as a significant source of measurement errors for the first mentioned measurement setup. Because of the different measurement setups of both examined methods, a direct comparison is not a target of the following investigations. The analysis of these slightly different measurement setups makes it possible to estimate the effect of potential influencing factors on the visualized results and identify limits of the demonstrated procedure. Finally, the feasibility of the presented approaches is judged by the plausibility of the achieved results.
In the context of the subsequent descriptions of this article, precision designates the single point precision (see Sect. 1), if not explicitly stated otherwise.
For the following demonstration purposes, a wire eroded, spur (involute) steel gear wheel characterized by 17 teeth, a face width of 8 mm and tip circle diameter of 19.4 mm (module 1 mm) is used. The measurement setup is characterized by the tactile CMM Zeiss UPMC 1200 CARAT S-ACC with a built-in rotatory table. In contrast to areal measurements, which are typically represented by or easily converted into a triangle mesh representation, CMM line scans consist of point clouds with additional meta-information (e.g. probing vectors). Two different measurement sequences which were both utilizing the CMM scanning mode were examined and compared against each other. The first one is characterized by the measurement and testing of gears as described in VDI/VDE 2612-1 (, ) in combination with the Software Zeiss Gear Pro and the built-in rotatory table of the CMM. The second measurement sequence consisted of a scan of the complete gear profile using the free-form scan feature within Zeiss Calypso and without the usage of the rotatory table. All controllable filter operations on the measurement data were switched off and the ball tip diameter was 0.8 mm. Each measurement sequence was repeated 20 times (n=20), following the recommendation in the ISO 15530-3:2011 standard (, ). Thus, this setting theoretically results in a relative uncertainty of the investigations, caused by the limited sampling, of 16 %, assuming normally distributed uncertainties (Joint Committee for Guides in Metrology, 2008). The measurements were performed in a temperature-controlled environment with temperatures set to K (temperature classification A according to VDI/VDE 2627-1 , ) with a relative humidity of 45 %±10 % (humidity classification A according to VDI/VDE 2627-1 , ).
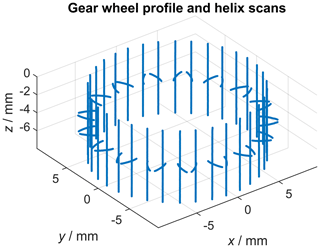
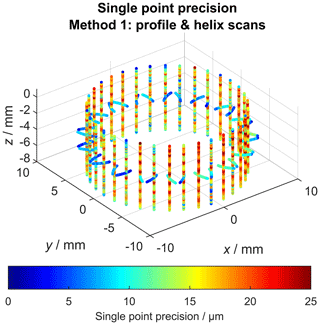
Figure 2Visualization of a complete tactile gear wheel measurement consisting of profile and helix scans.
3.1 Method 1: single profile and helix scans
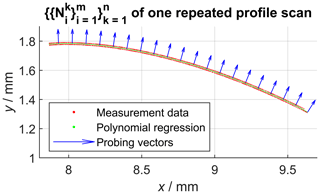
With respect to gear wheel inspection, the VDI/VDE 2612 guideline states that “Unless agreed otherwise, the profile is measured in a transverse plane approximately in the middle of the face width.” (, ) The profile measurement is complemented by the helix measurement: “The helix preferably is measured on the diameter of the V-cylinder.” (, ) Summarizing, each gear flank is described by one profile scan and one helix scan. The measurement data evaluation was done using the Zeiss Calypso 5.6 and Zeiss Gear Pro 5.9.0.2 software tools. The exact scan trajectory in interaction with the rotatory table within the presented examinations was determined by the Zeiss Gear Pro software. At the beginning of the measurement, the coordinate system of the gear wheel with respect to the coordinate system of the CMM was defined. First, the rotation axis of the gear wheel was determined by two circle scans. The remaining rotatory symmetry was dissolved by centring of the probe stylus between two gear teeth. Figure 2 shows the results of a complete gear wheel measurement using the described tactile measurement setup. Each profile and helix scan can individually be identified, which will be used within the data processing pipeline to calculate the nominal geometry for each single scan. This statement sounds counterintuitive, as there can only exist one nominal geometry for a give measurement object. Nonetheless, here this statement holds true as the measurement software scans along the nominal geometry (CAD file) and records the measured points with respect to that underlying nominal geometry. Thus, the measurement results of a tactile line scan are represented by the recording of m measurement points as well as the associated probing vectors and the distances measured from the nominal geometry to the measurement points in the direction of the probing vectors. Although the nominal geometry is not given explicitly in the coordinate system of the measurement system, the nominal geometry coordinates belonging to each measurement coordinate can be reconstructed as follows (Eq. 1):
This basic relation will be used for the determination of the single point uncertainty for this measurement setup in Sect. 4.1. In theory this calculation leads to the same nominal geometry for each measurement repetition. However, due to imperfections during the measurement this is not the case, and an additional calculation step must be inserted.
3.2 Method 2: measurement of the gear profile using a scan on curve
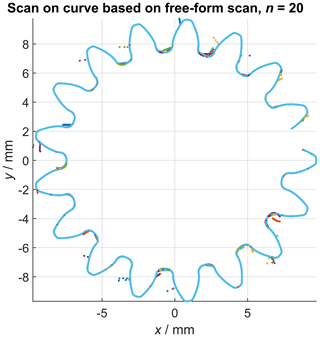
The second measurement series was created based on the scan unknown contour Zeiss Calypso functionality (feature set ScanInPlaneEndIsPlane according to I++ DME, 2020; see also Hausotte et al., 2009). The gear wheel was mounted such that its rotatory axis was aligned parallel with the z axis of the CMM. First, a 2-D-spline curve was created by scanning the unknown profile of the gear wheel in the x–y plane by probing the contour with a constant probing force, while the z axis of the CMM was locked at a constant height such that the scan was performed in the middle of each gear helix. Subsequently, this recorded spline curve was then used as the nominal outline of the gear wheel profile and 20 measurement repetitions were performed in scanning mode. In contrast to the measurements acquired using method 1 (see Sect. 3.1), a single measurement consists of the complete gear outline. The 21 measurements (20 measurement repetitions and the 2-D curve) were performed under the same conditions as the gear measurements mentioned above, including the ball tip diameter of 0.8 mm as well as the disabling of all data filter operations. Figure 3 shows the 20 contours of this measurement series as point clouds. This methodology is subsequently described as scan on curve.
As mentioned above, the single point uncertainty framework was developed to evaluate the uncertainty parameters from repeated areal measurements of measurement objects. In contrast to that, the tactile gear evaluation is characterized by line scans, and thus the sampling strategy using the normal vector of the sampling start surface of the reference geometry was not feasible. The reason for that is that in general a ray-tracing algorithm can only test the intersections of a ray with areal targets, which is not the case for line scans. Put differently, a ray-tracing test in three-dimensional space (shooting a ray in a defined direction starting from a defined location) cannot hit targets with zero area, such as lines. Even though some cases can mathematically be constructed where an intersection is still possible, in general the calculations yield no solution, ultimately because of the limited numerical accuracy. Consequently, the “shortest distance” sampling strategy had to be used. The following subsections describe the slightly different data processing pipelines for the evaluation of the profile and helix scans according to VDI/VDE 2612 (using Zeiss Gear Pro) and the measurement of the gear profile using the scan on curve approach.
4.1 Method 1: single profile and helix scans
In the following, denotes the nominal geometry of the same scan (helix or profile with index k) of all n measurements of the measurement series using Eq. (1). Assuming a perfect measurement, the superposition of all calculated sets of nominal geometry coordinates following Eq. (1) should result in the same nominal geometry by definition. However, Fig. 4 shows that this is not the case for real measurements due to various kinds of error sources influencing the measurements. In order to determine the single point precision, the common nominal geometry must be known, because it represents the definition of the sampling points. As a result of the pre-knowledge that the gear wheel is straight-toothed, we know that each nominal helix geometry must be a straight line. Consequently, one possibility to reconstruct the nominal helix scan line from the repeatedly measured scans is to calculate the solution for a line regression model (Fig. 4, green line). This was done based on the singular value decomposition (SVD) of all coordinates (Shakarji and Srinivasan, 2013), which results in a least squares solution for the scan direction vector. The position of that scan line is determined by the mean value of all coordinates of . The z components ez of all probing vectors recorded during the measurements were always zero; thus, all probing vectors are perpendicular to the scan direction ez.
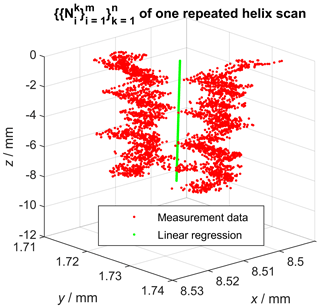
Figure 4Visualization of the calculated nominal geometry from repeated helix scans and the result of the linear regression. Caution: axes are not equally scaled.
That means that deviations from the nominal geometry perpendicular to both the probing vector and the scan direction can in principle not be recorded for straight-line scans using only one vector , which is also observable in Fig. 5. Consequently, the regression analysis was necessary here to reconstruct the nominal helix, which is required to sample the single point precision. Figure 5, which contains the same measurement data as Fig. 4, also shows that the repeated scans are affected by some kind of offset relative to each other, which indicates the influence of a dominant error source within the measurement chain. Consequently, this error source is also reflected by the subsequently determined single point uncertainty. After determining the nominal helix scan, sampling points were spaced out equally on that line. After that, the shortest (signed) Euclidean distances from each sampling point to each repeatedly measured helix scan defined by were calculated, resulting in the distance sets now associated with each sampling point. The calculation also allowed for intersections between sampling points using linear interpolation and is therefore not equal to a simple nearest neighbour search. The shortest distance sampling also additionally requires the vertex normal vectors for each sampling point in order to decide whether deviations are counted as positive or negative values. These vertex normal vectors for each sampling point are defined by the mean vector of . Next, the single point precision for each sampling point was defined by the standard deviation of . The described approach was then repeated for all helix scans.
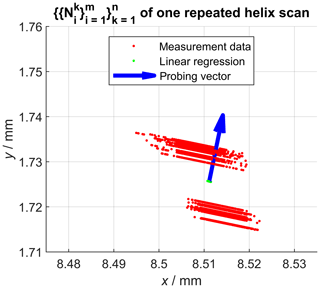
Figure 5Projection of the calculated nominal geometry into the x–y plane. Measurement deviations perpendicular to the probing vector (z component is zero) are not recorded.
A very similar data processing pipeline was implemented to determine the nominal profile scan geometry. Here, the SVD was used to identify the two main axes of the point cloud , which was then followed by a regression analysis using a high degree polynomial (ℝ2) model. The high degree polynomial to approximate the involute of the spur gear was used mainly because the mathematical description of the involute was only available to us implicitly through the CAD model. Additionally, one could argue that the deviations introduced by using a polynomial model instead of the mathematical involute are negligible in the examined solution space (the involute is only measured in the profile evaluation range defined in DIN ISO 1328-1:2018-03 Sect. 3.4.1.4; see also Fig. 6). Furthermore, the observed quantities are of a statistical nature (here mainly standard deviations of the sampled distances from the sampling contour), which also reduces the effects of a potential misrepresentation of the spur involute due to the polynomial model. Figure 6 shows the determination of the nominal profile scan line (embedded between the red lines). Note that the recorded z components ez of the probing vectors during the measurements are again always zero. After that, equally spaced sampling points are defined on that nominal geometry and the associated vertex normal vectors are calculated by derivation of the fitted function (z components ez set to zero). Finally, the single point precision could then be calculated the same way as described above, which was also repeated for each of the profile scans afterwards.
4.2 Method 2: measurement of the gear profile using a scan on curve
The evaluation of the scan on curve outline varies slightly from the previously described profile and helix scans. Because of the fact that each measurement consists of a complete profile of the gear wheel, a global registration approach was used. Thus, the transformation instructions to align the point cloud consisting of all measurement repetitions with the nominal geometry (CAD) of the gear wheel were determined using PolyWorks Metrology Suite 2018 IR5. A high-density point cloud representing the nominal gear profile was created by converting the CAD model of the gear wheel into a high-resolution triangle mesh using Autodesk Inventor Professional 2018, followed by our own implementation of a post-processing routine. Each point was associated with the normal vector defined by the vertex normal vectors defined within the underlying triangle mesh. After that, the following sampling problem can be reduced to a 2-D problem by projecting the coordinates onto the x–y plane. Figure 7 shows the starting position for the following sampling, during which the distances are calculated from each point on the nominal contour (green data points) to each of the n=20 measurement repetitions (red data points). The distances were calculated between a sampling point and the shortest distance to the targeted measurement point cloud, while linear interpolation between grid points was enabled, as already described in Sect. 4.1. Each single profile scan consisted of 2189 measurement points, the set defining the nominal geometry consisted of 457 283 coordinates. Again, the single point precision for each sampling point is described by the standard deviation of .
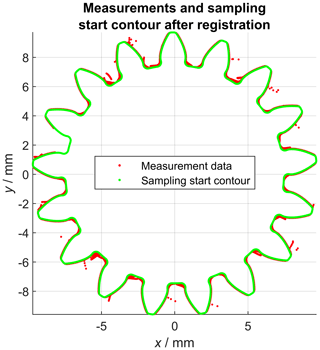
Figure 7Projection of the calculated nominal geometry into the x–y plane. Measurement deviations perpendicular to the probing vector (z component is zero) are not recorded.
5.1 Method 1: single profile and helix scans
Figure 8 shows the calculated single point precision for all gear wheel profile and helix scans. The observed precision values represent the superimposition of the geometric work piece deviations (compared to the nominal geometry) and all uncorrected measurement error contributions along the complete measurement chain. This includes the definition of the coordinate systems and additional components like the rotatory table. The profile scans exhibit systematically lower (better) precision values in the range between 2 and 10 µm compared to the helix scans (between 10 and 25 µm). Additionally, the precision noticeably fluctuates along the helix scans. For the examined measurement setup, the precision of the rotatory table can be regarded as especially important. Because of that, the rotatory table was subjected to additional examinations. The target of the following investigations was to determine whether the error characteristics of the rotatory table could account for the observed single point precision values. For that purpose, a flick standard (precision cylinder with a flattening of 15 µm) was repeatedly measured 20 times. A single measurement consisted of two circle scans of the cylinder shell surface, which were used to determine the cylinder axis. Another circle scan characterizes the front surface of the cylinder and the fourth circle scan measures the flick (flattened area). Figure 9 shows the distance of the measurement coordinates from the common Gaussian circle in polar coordinates.
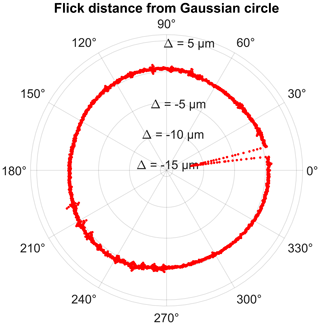
Figure 9Circle scan containing the flick (height 15 µm): distances from the Gaussian circle in polar coordinates. See also coordinates in Fig. 10, with ex matching the vector and ey matching the vector [ϕ=90° 1].
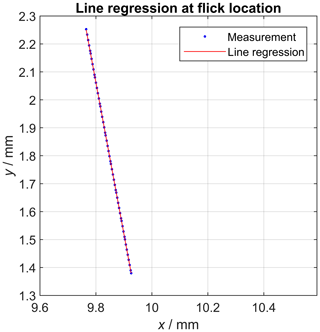
The location of the flick is clearly visible at around 10∘ (see also Fig. 10). The flick standard was rotated by the rotatory table during the measurement with a fixed position of the probe stylus. This approach makes the verification of the precision of the rotatory table possible, because the measured coordinates were then effectively represented by polar coordinates (angle in the x–y plane recorded by the rotatory table and radius by the CMM). The coordinate system was arranged such that the z axis was represented by the determined flick standard cylinder axis. Then, the measured coordinates, which are part of the flick, were extracted by an iterative distance and angle-based search algorithm. Afterwards, the position of the flick was determined by robustly fitting a polynomial function (degree 1), which can be written as Eq. (2), into the selected part of the circle scan (Fig. 10).
The angular representation of the slope (Eq. 3) of that line then represents the angular position of the flick.
Consequently, the scatter of that angle observed over multiple repeated measurements is influenced by the angular positioning precision of the rotatory table. Assuming an underlying normal distribution and targeting a level of confidence of approx. 99 %, the value of 3 standard deviations (Joint Committee for Guides in Metrology, 2008) of the angular position was determined to be 83.7 arcsec. Additionally, the probing repeatability of the measurement chain was tested by determining the scatter of the perpendicular distance of the fitted polynomial function to the cylinder axis of the flick standard. Three standard deviations were calculated as 0.41 µm. During the calibration of the rotatory table (DIN Deutsches Institut für Normung e.V., 08/2000; VDI/VDE, 05/2006), a wobbling angle of 24 arcsec was determined. Additionally, the angle between the rotatory axis and the CMM coordinate system was characterized by 6 arcsec. These two error sources are of a systematic nature and were therefore corrected by the measurement software.
5.2 Method 2: measurement of the gear profile using a scan on curve
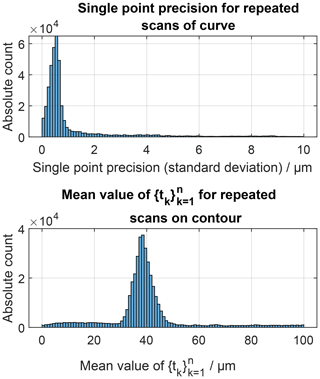
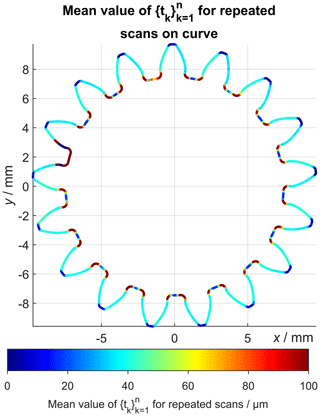
Figure 11 shows the single point precision (standard deviation) for the examined repeated gear wheel measurements using scan on curve. The false colour plot shows very low precision values (<1 µm) for the middle part of the gear profile, while the observed precision values are significantly larger at the tooth roots. The histogram evaluation of the precision values associated with all sampling points confirms that most of the values are smaller than 1 µm (Fig. 12). As mentioned above, the single point precision is described by the standard deviation of . Similarly, the local superposition of the geometrical work piece deviations and the systematic measurement error can be calculated by the mean value of , which is shown in Fig. 13 (see also Sect. 1). This plot shows that the tooth root regions are systematically affected by high observed deviations, while the middle part of the tooth profile homogeneously exhibits deviations of about 40 µm. This is also confirmed by the histogram visualization shown in Fig. 12.
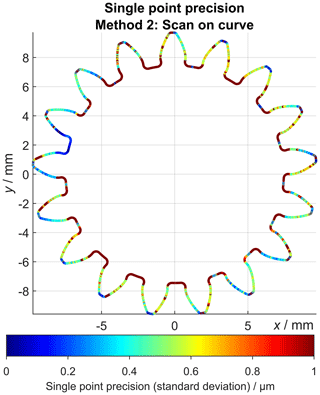
Figure 11Single point precision (standard deviation) values for all sampling points of the nominal contour. See also the histogram visualization of the shown values in Fig. 12.
As already mentioned during the discussion of Fig. 4, the measurement chain used to determine the single point precision for helix and profile scans according to VDI/VDE 2612-1 was affected by various sources of uncertainty which led to the observation of precision values of up to 20–25 µm when determining the single point precision. This could not be explained by the (single point) probing precision of the CMM itself, which is verified by regular calibration of the measurement device as well as by the observed positional repeatability (0.41 µm with 99 % confidence) of the perpendicular distance between the flick feature and the cylinder axis. A substantial part of the observed single point precision could be explained by the lack of precision of the rotatory table. The remaining part of the observed single point precision is caused by various other influences. It is possible that the centring operation during the definition of the coordinate system of the gear wheel was unstable enough to be responsible for some of the observed effects. Furthermore, the surface roughness is regarded as an important influence factor in the achieved measurement uncertainties, which is reflected in the fact that the surface roughness value Rz directly contributes to the measurement uncertainty using the “Virtual CMM” for the uncertainty calculation of the utilized system (Wäldele and Schwenke, 2002). This system (version 1) supports uncertainty estimation for measurements using single point probing (Wäldele and Schwenke, 2002). Additionally, dynamic effects during the scan can worsen the achieved precision (Pereira and Hocken, 2007; Jinwen and Yanling, 2011; Keck et al., 2016). It is possible that the scan control system reaches some limitations, considering the more than 20 years of operating time of the CMM. Some hints at that fact can also be observed in Fig. 6 for the helix scans, where the precision fluctuates along the scan trajectory.
The determination of the single point precision of a complete gear wheel profile scan using the scan on curve functionality resulted in very high observed precision values for the middle part of the tooth profiles. In the tooth root regions, comparably low precision values were observed, which could be explained by the high curvature values of the scan trajectory in those regions. In the case of the gear profile measurement, the latter method exhibits superior measurement uncertainty characteristics compared to the first method, which is most likely mainly caused by the usage of an imprecise rotatory table.
In this paper, an adjustment of the single point uncertainty framework, which had primarily been developed to evaluated areal measurements, was presented. Now, locally resolved uncertainty values can also be calculated for different CMM examinations using the scanning mode. Repeated measurements of a steel gear wheel were used to generate the measurement data. In the case of the measurement of profile and helix scans, the adjustment was characterized by the additional reconstruction of the underlying nominal geometry from the measurement data. The measurement series exhibited unexpectedly low precision, which is in general untypical of tactile CMM measurements. A large part of the observed precision could be assigned to the uncertainty of the used rotatory table, although the observation could not be fully explained. The second method, scan on curve, yielded very low single point precision values and is therefore very well suited for the demonstrated use case of inspecting spur (involute) gear wheels. Finally, the single point uncertainty framework was successfully used to determine the precision of the complete measurement chain of repeated CMM measurements. The demonstrated visualization options give the possibility of observing the uncertainty characteristics of a measurement chain for a complete work piece and therefore identifying possible flaws in the design of the testing plan. Future research efforts need to focus on the verification of these results by examination of different test objects.
In this paper, we present a methodology to determine the single point uncertainty of steel gear wheels using tactile coordinate measuring machines in scanning mode. The algorithms used for this purpose, the parameters for the generation of the measurement data and all data processing steps are described in detail in the paper. Additionally, publications cited in the paper describe the algorithms used to determine the single point uncertainty. Thus, all information needed for a reproduction of the presented results is available to the interested reader.
AMM contributed to the conceptualization, data curation, formal analysis, investigation, methodology, software, validation, visualization, writing of the original draft and writing, review and editing. TH contributed to the conceptualization, funding acquisition, project administration, formal analysis, supervision and writing, review and editing.
The authors declare that they have no conflict of interest.
This article is part of the special issue “Sensors and Measurement Systems 2019”. It is a result of the “Sensoren und Messsysteme 2019, 20. ITG-/GMA-Fachtagung”, Nuremberg , Germany, 25–26 June 2019.
The authors would like to thank the German Research Foundation (DFG) for supporting the FOR 2271 process-oriented tolerance management based on virtual computer-aided engineering tools research project under grant number HA 5915/9-2. The authors thank the Institute of Manufacturing Technology (LFT, Friedrich-Alexander-Universität Erlangen-Nürnberg) for providing the steel gear wheel used for demonstration purposes in this article. Gratitude is owed to Philipp Kaller (FMT) for the implementation of the tactile coordinate measurements and the very helpful discussions associated with this work. Finally, the authors would like to thank both anonymous reviewers for their insightful comments on the paper, as these notes led to an improvement of the work.
This research has been supported by the Deutsche Forschungsgemeinschaft (grant no. HA 5915/9-2).
This paper was edited by Sascha Eichstädt and reviewed by two anonymous referees.
Brinkmann, B.: International vocabulary of metrology: Basic and general concepts and associated terms (VIM) German-English version ISO/IEC-Guide 99:2007, Corrected version 2012, Beuth Wissen, Beuth, Berlin, 4. edn., 2012. a
DIN Deutsches Institut für Normung e.V.: Annahmeprüfung und Bestätigungsprüfung für Koordinatenmessgeräte (KMG): Teil 3: KMG mit der Achse eines Drehtisches als vierte Achse (ISO 10360-3:2000) Deutsche Fassung EN ISO 10360-3:2000, 08/2000. a
Fleßner, M., Müller, A. M., Götz, D., Helmecke, E., and Hausotte, T.: Assessment of the single point uncertainty of dimensional CT measurements, in: NDT.net issue Vol. 21 No. 02, available at: https://www.ndt.net/article/ctc2016/papers/ICT2016_paper_id48.pdf (last access: 26 September 2019), 2016. a
Glassner, A. S.: An introduction to ray tracing, Kaufmann, San Francisco, Calif., digital print edn., 2007. a
Hausotte, T., Percle, B., and Jäger, G.: Advanced three-dimensional scan methods in the nanopositioning and nanomeasuring machine, Meas. Sci. Technol., 20, 084004, https://doi.org/10.1088/0957-0233/20/8/084004, 2009. a
I++ DME: Dimensional Measurement Equipment Interface, available at: https://sourceforge.net/projects/iplusplusdme/ (last access: 2 September 2019), 2020. a
International Organization for Standardization: Geometrical product specifications (GPS) – Coordinate measuring machines (CMM): Technique for determining the uncertainty of measurement: Part 3: Use of calibrated workpieces or measurement standards (ISO 15530-3:2011), 2018. a
Jinwen, W. and Yanling, C.: The geometric dynamic errors of CMMs in fast scanning-probing, Measurement, 44, 511–517, https://doi.org/10.1016/j.measurement.2010.11.003, 2011. a
Joint Committee for Guides in Metrology: Guide to the expression of uncertainty in measurement: JCGM 100:2008 – GUM 1995 with minor corrections, 2008. a, b
Keck, A., Sawodny, O., Gronle, M., Haist, T., and Osten, W.: Active Compensation of Dynamic Errors in a Coordinate-Measuring Machine**This work was supported by the DFG (Deutsche Forschungs-gemeinschaft / German Research Foundation) under grants SA 847/16-1, OS 111/42-1, IFAC-PapersOnLine, 49, 636–641, https://doi.org/10.1016/j.ifacol.2016.10.672, 2016. a
Möller, T. and Trumbore, B.: Fast, Minimum Storage Ray-Triangle Intersection, Journal of Graphics Tools, 2, 21–28, https://doi.org/10.1080/10867651.1997.10487468, 1997. a
Müller, A. M. and Hausotte, T.: Comparison of different measures for the single point uncertainty in industrial X-ray computed tomography, in: 9th Conference on Industrial Computed Tomography, e-Journal of Nondestructive Testing, available at: http://www.ndt.net/iCT2019, last access: 26 September 2019a. a, b, c
Müller, A. M. and Hausotte, T.: Utilization of single point uncertainties for geometry element regression analysis in dimensional X-ray computed tomography, in: 9th Conference on Industrial Computed Tomography, e-Journal of Nondestructive Testing, available at: http://www.ndt.net/iCT2019, last access: 26 September 2019b. a
Müller, A. M., Wohlgemuth, F., and Hausotte, T.: Simulation-based correction of systematic errors for CT measurements, in: 8th Conference on Industrial Computed Tomography, e-Journal of Nondestructive Testing, available at: http://www.ndt.net/iCT2018 (last access: 26 September 2019), 2018. a
Müller, A. M., Metzner, S., Hausotte, T., Schubert, D., and Drummer, D.: Separation of locally determined work piece deviations and measurement uncertainties for structured-light scanning of customized polymer gear wheels, in: 20. GMA/ITG-Fachtagung Sensoren und Messsysteme, VDE Verlag GmbH, Berlin, 2019a. a
Müller, A. M., Oberleiter, T., Willner, K., and Hausotte, T.: Implementation of Parameterized Work Piece Deviations and Measurement Uncertainties into Performant Meta-models for an Improved Tolerance Specification, Proceedings of the Design Society: International Conference on Engineering Design, 1, 3501–3510, https://doi.org/10.1017/dsi.2019.357, 2019b. a
Pereira, P. H. and Hocken, R. J.: Characterization and compensation of dynamic errors of a scanning coordinate measuring machine, Precis. Eng., 31, 22–32, https://doi.org/10.1016/j.precisioneng.2006.01.006, 2007. a
Schlick, C. and Subrenat, G.: Ray Intersection of Tessellated Surfaces: Quadrangles versus Triangles, in: Graphics Gems V, 232–241, Elsevier, https://doi.org/10.1016/B978-0-12-543457-7.50040-1, 1995. a
Shakarji, C. M. and Srinivasan, V.: Theory and algorithms for weighted total least-squares fitting of lines, planes, and parallel planes to support tolerancing standards, J. Comput. Inf. Sci. Eng., 13, 031008, https://doi.org/10.1115/1.4024854, 2013. a
Shirley, P. and Morley, R. K.: Realistic ray tracing, AK Peters, Natick, Mass., 2. ed. edn., 2003. a
Suffern, K. G.: Ray tracing from the ground up. Wellesley, Mass., Peters, A. K., ISBN 978-1-56881-272-4, 2007. a
VDI/VDE: Genauigkeit von Koordinatenmessgeräten Kenngrößen und deren Prüfung: Leitfaden zur Anwendung von DIN EN ISO 10360-3 für Koordinatenmessgeräte mit zusätzlichen Drehachsen, 2006. a
VDI/VDE: Measuring rooms – Classification and characteristics – Planning and execution, 2015. a, b
VDI/VDE: Measurement and testing of gears: Evaluation of profile and helix measurements on cylindrical gears with involute profile, 2018. a, b, c
Wäldele, F. and Schwenke, H.: Automatische Bestimmung der Messunsicherheiten auf KMGs auf dem Weg in die industrielle Praxis (Automated Calculation of Measurement Uncertainties on CMMs – Towards Industrial Application), tm – Technisches Messen Plattform für Methoden, Systeme und Anwendungen der Messtechnik, 69, 550, https://doi.org/10.1524/teme.2002.69.12.550, 2002. a, b
- Abstract
- The concept of the single point uncertainty
- Aim and scope of this article
- Measurement data acquisition
- Data processing pipeline to calculate the single point precision
- Results
- Discussion
- Conclusions
- Data availability
- Author contributions
- Competing interests
- Special issue statement
- Acknowledgements
- Financial support
- Review statement
- References
free-form scanCMM functionality. Both methods were examined with respect to their obtained single point uncertainty.
- Abstract
- The concept of the single point uncertainty
- Aim and scope of this article
- Measurement data acquisition
- Data processing pipeline to calculate the single point precision
- Results
- Discussion
- Conclusions
- Data availability
- Author contributions
- Competing interests
- Special issue statement
- Acknowledgements
- Financial support
- Review statement
- References


