the Creative Commons Attribution 4.0 License.
the Creative Commons Attribution 4.0 License.
Determining the dimension of subsurface defects by active infrared thermography – experimental research
This paper presents research into a method of processing thermal images aimed at detecting and characterizing material defects, or non-uniformities, of the internal structure of materials. Active thermography was chosen as the NDT method. Hidden defects were revealed by analysing the temperature field of the tested material's front surface which was externally excited with heating lamps. Background removal and image segmentation were applied to the last thermogram in the sequence recorded at the end of the heating phase. The paper focuses on the quality of determining lateral dimensions of subsurface flaws in a polymethylmethacrylate slab with bottom holes drilled to imitate flaws. The following accuracy-affecting factors were taken into account: defect depth, emissivity of the inspected surface as an input, user-set parameter for the IR camera, type of filtering used to eliminate the effect of non-uniformity when heating the object surface with an external source, and global and local thresholding as a segmentation method used for defect detection and sizing.
- Article
(781 KB) - Full-text XML
- BibTeX
- EndNote
At present, materials such as composites and multi-layered or honeycomb structures have been used ever more widely due to good physical properties in relation to low weight. Their application in very demanding industry sectors, such as aerospace, naval or automotive industry, makes rigorous examination of all the parts necessary in both the production phase and later operation. Non-destructive testing relies on a great number of analytical techniques to evaluate the properties of a material, component, or system without inflicting damage. This characteristic becomes especially valuable when production lines cannot be stopped for testing. Typically, the first test step involves visual inspections carried out by the operator or specialized machine vision systems working in the visual range. Later, objects are inspected for hidden structural defects by using some widely accepted NDT techniques, e.g. radiographic or ultrasound methods as well as active thermography.
With respect to the defect location relative to the object surface, material defects may be divided into surface, subsurface, and internal flaws; with respect to the shape, they are flat or volumetric. Discontinuities originating during production and operation are commonly distinguished. These include tearing of the object's macrostructure and possibly tearing of its microstructure, which are attributable to a faulty production process or object fatigue in the course of normal operation, respectively. Structural damage, cavities caused by mechanical or chemical factors, and internal stress (Lewinska-Romicka, 2001) fall into the first category. Operational damage, however, may result from static, dynamic, and shock loads caused by external forces, corrosion, erosion, thermal shock, chemical reactions, or mechanical friction. Solid metallic and non-metallic intrusions with a sharp shape, overlaps, and delaminations are also dangerous. Other material defects include geometrical discontinuities involving changes of thickness and shape, or cavities resulting from production processes or fatigue. Flat discontinuities, especially those originating from the surface, are considered most significant since most critical stresses occur on the surfaces of objects. The closer they are to the surface the more risk they pose (Lewinska-Romicka, 2001). Composites, however, suffer from low inter-laminar strength. Objects impacting the material surface at low energy frequently cause delamination of layers, however, without noticeable surface manifestation (Abrate, 1998). Another problem affecting composites is linked to internal porosity forming during the manufacturing process because of uncontrolled process variations. Some gas may remain trapped and give rise to formation of voids which affect the material durability (Huang and Talreja, 2005; Hagstrand et al., 2005).
Determining selected parameters of material flaws detected by means of an NDT method is essential for understanding their underlying causes and assessing the risk of object destruction during subsequent operation. Defect parameters include the depth of occurrence, geometrical dimensions, i.e. lateral size and thickness plus thermal properties compared to those of the material inspected (Wiggenhauser, 2002; Ibarra-Castanedo et al., 2009; Bagavathiappan et al., 2013; Milovanovic and Banjad Pecur, 2016).
This paper focuses primarily on determination of the defect lateral size and its accuracy, considered for experimental data processed with the proposed processing path. A review of existing approaches to defects sized by means of active thermography with respect to various materials is presented below as grounds for further investigations.
Vavilov and Shiryaev (1979) demonstrated that extreme values of temperature derivatives with respect to surface coordinates correspond precisely to the projections of defect edges on the tested surface. Since derivation tends to enhance high-frequency noise, this technique can be practically applied only to noise-free profiles. To obtain such profiles, one must deal either with large temperature signals, apply data approximation, or apply smoothing. Moreover, Grys et al. (2014) has confirmed that observation by means of 3-D simulations.
Line profiles also make it possible to calculate the defect size employing the full-width half-maximum (FWHM) method, which is based on measuring the distance between the points that correspond to half the maximum temperature signal. Saintey and Almond (1995), Almond et al. (1996), and Avdelidis et al. (2003) have studied evolution of temperature profiles over time and coined the “profile shrinkage” term, thus suggesting FWHM should be measured at early times.
An artificial neural network was used as an expert system to obtain defect size details from transient thermography data (Saintey and Almond, 1997). Experimental data were reduced to few simple measurements which suffice to determine the characteristics of a defect. Afterwards, these factors became the input data for the neural network and they include the following: the time image contrast reaches half its maximum value, the time image contrast falls to half its maximum value, FWHM value at half-rise time, FWHM value at half-fall time, and maximum relative contrast attained by the image.
It was confirmed experimentally that an analysis of the extreme values of the first derivative ensured an accurate evaluation of the lateral size in an aluminium plate and carbon fiber reinforced plastic (Vavilov, 2009). Good accuracy was also achieved with the FWHM criterion. In the case of aluminium, more accurate estimates occurred at shorter times because of extensive heat diffusion at longer times. In CFRP, both overestimates and underestimates of the lateral size were observed when applying the FWHM technique. As reported by Wysocka et al. (2012) the FWHM method was successfully applied to an austenitic steel plate using pulsed infrared thermography.
Zoecke et al. (2010) applied phasegrams (lock-in thermography) to evaluate defects of anisotropic CFRP material. It was concluded that there is an optimal frequency when the signal-to-noise ratio is at its maximum and the defect becomes clearly visible. The shape of cross-like defects is well restored.
Montanini (2010) reported results of the size estimation range from a few percentage points for shallower defects to close to 30 % for the deepest ones. The relatively high errors found may be attributed to the radial heat diffusion in the polymethylmethacrylate (PMMA) slab that rendered measuring the actual hole boundary quite difficult for deeply located material flaws.
Another approach represents the shearing-phase technique employed by Manyong Choi et al. (2008), where the inspected image is shifted by a number of pixels to obtain a shifted image, while subtracting one image from the other gives the shearing-phase distribution. Experimental results for a steel plate with artificial subsurface defects closely followed actual values.
The author believes a dearth of robust “gold standard” techniques for active thermography, which makes it difficult to keep the NDT method reliable if focusing on defect assessment quantitatively, justifies his using his own procedure discussed below. The procedure developed by the author (with significant support by other researchers) allows, among other things, for defect sizing as one of the aspects of the newly invented protocol for thermal image processing which produces quantitative defect characterization. Key elements of this procedure were discussed and published in previous publications (Grys, 2011; Grys et al., 2014, 2015). The main objective of the research is to assess the pluses and minuses of applying this procedure for simple-shaped uniform materials with artificial flaws, like the PMMA slab with back-holes. If this procedure is implemented successfully, the next scheduled study will consist of testing its applicability for many truly defective materials, e.g. composites, laminates, and honeycomb structures. The procedure allows for automatic defect size determination and it has successfully passed validation for simulated data based on a 3-D numerical model of heat conduction (Grys et al., 2014).
This paper will assess its applicability for real measurements.
The tested material was a PMMA cuboid 123 mm × 100 mm and 11.10 mm thick. Nine holes were drilled in the bottom side of the sample to simulate the presence of defects. They all have an identical shape of a 10 mm diameter hollow cylinder and are located at various depths; see Fig. 1. A thermographic system was used to observe the front surface being excited with external heaters. To ensure satisfactory conditions for an IR inspection, the tested surface was covered with a black mat paint of high emissivity ε > 0.9.
The tested material was illuminated by two incandescent 250 W lamps mounted symmetrically on both sides and above the slab, resulting in almost symmetrical irradiation of the sample surface. The thermovision system consisted of an FLIR ThermaCAM PM595 IR camera and an external IC2-Dig16 card serving as a frame-grabber to connect the camera to a PC computer, and record the thermogram sequence in real time. The distance between the camera and the object was set at 0.6 m. A reference thermogram was recorded at room temperature, i.e. before the lamps were switched on; subsequently, a sequence of thermograms was recorded at 2 s intervals until the end of the heating phase, i.e. 120 s.
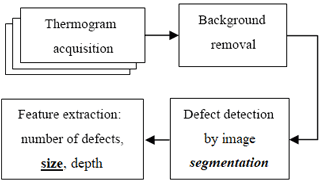
To detect the flaws and evaluate their parameters, new techniques were invented and combined with others generally known in the field of signal processing. They are as follows: region of interest, digital filtering, automatic object counting and reporting, and fitting experimental data to a 1-D analytical model of physical behaviour. For complex material shapes or better accuracy, a 2-D model of heat conduction may be applied, as shown for example in Manohar and Lanza di Scalea (2013). Figure 2 shows a simplified version of the proposed data processing path with elements related to the task in bold type, i.e. determination of the transversal size of the defect. More details pertaining to the data processing path and algorithms were given in Grys (2011). To facilitate processing of the sequence of collected thermograms, dedicated software, called “IR Defect Detector”, was developed. The software tool was built in the GUIDE MATLAB environment and is available at no charge at http://github.com/slavo5/irdetector.git, last access: 26 Jaunary 2018. The software imports thermograms saved in the MATLAB format. The files must be saved externally by dedicated software connected to the infrared camera. In the version discussed here, the IR Defect Detector was tested with FLIR ThermaCAM® Researcher™ 2.x Pro software: http://www.flir.co.uk/cs/display/?id=42404, last access: 26 Jaunary 2018. From the user point of view, the software functionalities can be divided into two groups: basic and advanced. The basic features of the IR Defect Detector are almost identical with those found in other commonly used software. They allow for thermogram visualization and location of defective areas by visually examining the thermograms. Further analysis remains interesting if flaws need to be characterized quantitatively which is done semi-automatically, depending on the machine vision concept. To achieve the objective, that is flaw parameter assessment and automatic defect reporting, some extra techniques are coded, i.e. background estimation and contrast improvement, object labelling, fitting the experimental data to the 1-D analytical model of physical behaviour in order to estimate the defect depth and thermal properties with respect to those of the inspected material. The decision is based on the information extracted and evaluated from the region of interest. The advanced features are focused on feature extraction, classification, and reporting. The algorithm of the defect depth estimation requires two input parameters: a thermal mismatch factor Γ, also referred to as the thermal reflection coefficient (Osiander and Maclachlan Spicer, 1998), and diffusivity of the tested material. The IR Defect Detector offers the functionality of determining the sign of the factor Γ for each defect on the basis of the filtered contrast (FC) sign or the relative incremental filtered contrast (RIFC; both described below) obtained for areas above the defects, based on a processed thermogram. The Γ sign was described verbally as a relation between the thermal properties of the defect with respect to those of the tested material sample, i.e. “defect is thermal insulator/conductor ...”. For Γ < 0, the defect is a “thermal insulator”, and for Γ > 0 it is a “thermal conductor”. The absolute value of the mismatch factor Γ must be predicted by the user based on expert knowledge about the types of materials, i.e. an object that is being tested and non-homogeneity. The Γ factor is determined by the differences between the effusivities of the contiguous materials. The larger the difference, the higher the thermal signature of the nonhomogeneities. However, it is limited to a range < −1, 1 >.
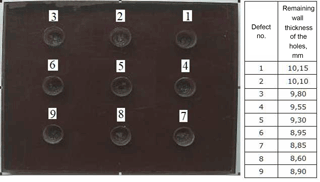
Figure 1Slab of PMMA; view from the bottom side with nine visible holes imitating real flaws (mirrored horizontally).
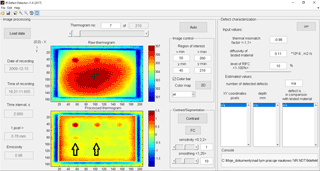
Figure 3Screen of the IR Defect Detector for early phase of heating – the option “Defect characterization” is inactive.
In Fig. 3, the GUI is shown with the option of automatic “defect characterization” disabled. The option allows automatic reporting of the number of defects detected, their depth, and their thermal character, i.e. a defect is a thermal conductor or insulator, depending on the tested material parameters. More information on how the tasks are realized has been published in Grys et al. (2015). As the defect size is determined manually the option is not needed for this particular purpose. A thermogram recorded by the IR camera is presented with a “Raw thermogram” tag accompanied by a colour bar assigned to the Kelvin scale measurements. Defects located deeper become more visible with image processing performed with non-uniform background estimation and removal, following an FC or RIFC operation – marked with black arrows in Fig. 3. The units of the x and y axes are pixels. The unit of the lower colour bars is expressed in the Kelvin scale if FC applies, or is dimensionless in an RIFC case.
The formulas are used for noise suppression and to remove the effect of non-uniform heating of the object surface with an incandescent lamp, possibly attributable to variable density of the absorbed energy or emissivity of tested material. The image tagged “Processed thermogram” presents the effect of a flattened background. The FC technique (Grys, 2011, 2012) is based on classical unsharp filtering as in Eq. (1):
Every pixel with (x,y) coordinates of the thermogram recorded at the time instant t is processed with the above formula. The role of the filtering is to temporarily mask the influence of the defect (seen as a hot or cold object), by approximating the background as in the case of a defect-free thermogram. Additionally, the filter should have a noise-reducing capability. A smoothed version of the image is typically obtained by filtering the original image with a mean, median, or Gaussian filter kernel. The morphological operation, i.e. erosion followed by dilation with the same structuring element, can also be applied, or simply a polynomial approximation, as in Dudzik (2010). For this paper, the two-dimensional Gaussian kernel was employed. Its notation in the vector form is given by Eq. (2) recalled from Bishop (2006):
where i is the vector of independent variables (indexes), μ is the vector of the central values for which the function obtains maximum, B is the width vector determining the function spread, and cov is the covariance matrix. The above parameters are expressed by Eq. (3), where ri,j is the correlation measure of the variables i,j determined in interval i = < 1, imax > and j = < 1, jmax >, respectively. These variables are as follows (Bishop, 2006):
It is necessary to norm the filter coefficients to assure the filter gain equals that shown in Eq. (4). The i, j and B are scalars now due to the extra assumption and for simplicity of application. The coefficient because i and j variables are independent. The function span was assumed to be , . It results in a symmetrical shape of the Gaussian curve (“bell” in the 3-D space):
The filtering operation filter (T) in Eq. (1) is performed by a 2-D discrete convolution of the function fscal (i,B) and temperature reading from the thermogram. Double 1-D filtering represents an alternative to 2-D filtering. Then, the rows of the image are filtered with the 1-D filter, and the filtered image is subsequently filtered again column-wise by the same 1-D filter.
Another formula of the contrast, proposed and discussed previously by author (Grys, 2011), is relative incremental filtered contrast, which is expressed by Eq. (5):
Temperature Tref is calculated as an arithmetic mean based on one reference thermogram, typically recorded before the heating phase under ambient conditions. It is a constant value for each processed thermogram. Both filtering techniques, FC and RIFC, process a single thermogram. If necessary, e.g. for estimating the defect depth as discussed in Grys et al. (2015), the FC or RIFC technique is repeated for each thermogram of the sequence to obtain temperature variations of selected points of the image above over time, typically above the defect's centre.
The next phase of an image processing path, similar to that presented in Venegas et al. (2012), includes the segmentation technique. Assuming the presence of two classes only, segmentation is identical with image binarization. Each pixel is classified either as background, i.e. defect-free area, or as defect, expressed symbolically in a white or black colour, depending on the registered temperature processed with FC or RIFC. The pixel with a value higher than the assumed threshold is classified as belonging to the defective area. Automating this process requires setting a threshold value which may significantly affect size estimates. The Otsu method (Otsu, 1979) was applied to evaluate the optimal threshold level. Some premises for this method were presented in Grys et al. (2014) and are referenced here with a view of enhanced text readability. The optimal threshold value is sought for the entire image so as to minimize the intra-class variance of pixels classified into two groups. Based on the theory of statistics, minimizing two intra-class variances equals to maximizing the inter-class variance. Now, one needs to look for a threshold value for which the following function reaches maximum for all intensity levels:
where Pback is the probability (relative frequency) of the image including pixels with intensity levels 0, 1, ..., level; Pob is the probability (relative frequency) of the image including pixels with intensity levels level + 1, ..., level ; and μback and μob are the arithmetic mean intensities of pixels assigned to the classes. The measure is based on the number of pixels assigned to the “background” and “defect” classes and an arithmetic mean of pixels which belong to these two classes. Prior to that, a thermogram is scaled to the < 0, 255 > interval. The threshold value is used to convert an image with 256 intensity levels into a binary image with two levels: 0 and 1. Results of the segmentation are compared for global (which means the same value for all pixels) and local thresholds of clusters of pixels associated with each defect and its local surroundings. The threshold values are sought for each defect individually.
This chapter will attempt to assess the accuracy of determining the diameter of the detected defects. The following factors are taken into account: defect depth, emissivity ε of the inspected surface as an input, user-set parameter for the IR camera, filter B coefficient value, and the type of filtered contrast applied to process the image with FC or RIFC. For the experiment discussed here, pixel granularity of the thermal image is 0.78 mm pixel−1; and finally, the defect diameter of 10 mm corresponds to 12.8 pixels ≈ 13 pixels. It was calculated based on the camera parameters and a known distance. For the selected IR camera and its standard lens 24∘ × 18∘ with a matrix of 320 × 240 pixels (H × V), the horizontal and vertical resolutions corresponding to the instantaneous field of view (IFOV) of a single pixel are equal and depend only on the distance d between the camera and the object, saved in the measuring files and set by the individual performing the experiment as the object parameter. Finally, we can obtain IFOV from the following expression:
For the distance d=0.6 m, IFOV = IFOVH = IFOVV is just 0.78 mm. This parameter is illustrated in Fig. 3.
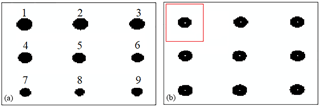
Figure 4Effect of segmentation after applying RIFC technique with B=5 and emissivity set to ε=0.98: (a) global thresholding, (b) local thresholding.
Table 1Evaluated horizontal dimension of defects from segmented thermogram with global thresholding, measured in pixels. The values which vary from the real size by not more than 1 pixel, i.e. [12, 13, 14], have been additionally highlighted in bold type.
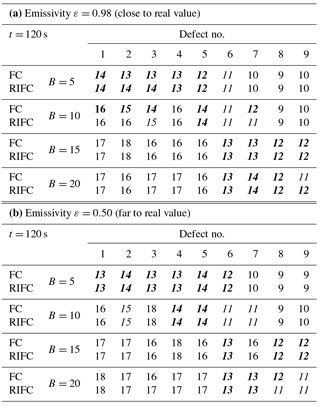
Table 2Evaluated horizontal dimension of defects from segmented thermogram with local thresholding, measured in pixels. The values which vary from the real size by not more than 1 pixel, i.e. [12, 13, 14], have been additionally highlighted in bold type.
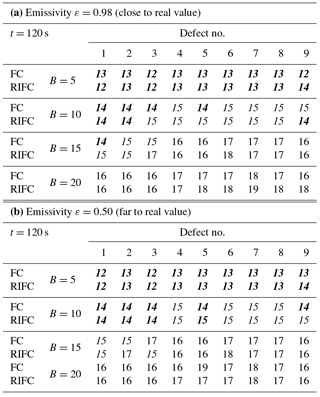
The effect of segmentation applied to the thermogram of a sample with nine defects is illustrated in Fig. 4a. It must be carefully observed that the defects are individually numbered. If the defects are arranged by the increasing depth, the numbers are: 1, 2, 3, 4, 5, 6, 9, 7, 8, with defect no. 8 being the deepest, and defect no. 1 the shallowest. Analysing Fig. 4a, one can observe certain underestimation of deeply located defects, i.e. 7–9. To correct the disadvantage the threshold value is recalculated for each defect using only local information (surroundings) from the part of the thermogram, as discussed in the previous section. The idea is presented in Fig. 4b. The pixels used to find the optimal threshold for defect no. 1 are inside the red square. Now, all the defects are characterized with higher accuracy. Tables 1 and 2 present the results for all the defects obtained by analysing a single thermogram recorded at the end of the heating phase, i.e. at t = 120 s. The time is quite sufficient to reveal all the defects (Grys et al., 2015). The italic font was used for values amounting to ±20 % of the real diameter and are limited to the range of [11, 15] pixels. The values which vary from the real size by not more than 1 pixel, i.e. [12, 13, 14], have been additionally highlighted in bold type. Conclusions from the experiment conducted for the tested sample are as follows:
-
The accuracy of defect size determination depends negligibly on the emissivity value assumed in the camera processing model.
-
Choosing the FC or RIFC filtered contrast seems to have almost no effect on the defect size determination accuracy.
-
The average accuracy, measured by the number of the shaded cases in both tables, remains comparable whether global or local thresholding is selected. The first case defects located deeper under the surface were correctly characterized with higher values of the parameter B, which means B should adaptively change during the filtering routine. The advantage of applying the local threshold means it is possible to use a single B value and still obtain satisfactory accuracy for most defects.
From the practical point of view, the main conclusions are as follows: the proposed method is insensitive enough for an incorrect setting of emissivity as the IR camera input parameter and insensitive (within a limited range) enough for un-matching of the filter parameter B to the real defect dimension when applying local thresholding. For better accuracy, the B value must be precisely assumed in advance. FC formulas, as a simpler and faster technique, can be used instead of the RIFC if the defect depth need not be estimated.
The next study, scheduled in the near future, will focus on testing many truly defective materials to speed up the validation process for the proposed processing path. To meet this objective, some aspects will still require investigation, such as the problem of estimating the uncertainty of size determination, automatic determination of B for an unknown defect size, and the method of splitting a thermogram into separate sub-areas for material flaws with irregular shapes. The work ahead will be a challenging task.
The data that support the findings of this study are not publicly available, but can be delivered on request. Please contact the author.
The author declares that he has no conflict of interest.
This article is part of the special issue “Sensor/IRS2 2017”.
It is a result of the AMA Conferences, Nuremberg, Germany, 30 May–1 June
2017.
Edited by: Andreas Schütze
Reviewed by: two anonymous referees
Abrate, S.: Impact on composite structures, Cambridge University Press, Cambridge, 26–160, https://doi.org/10.1017/CBO9780511574504, 1998.
Almond, D. P., Hamzah, R., Delpech, P., Peng, W., Beheshty, M. H., and Saintey M. B.: Experimental investigations of defect sizing by transient thermography, in: Quantitative Infrared Thermography, 96, Stuttgart, Germany, https://doi.org/10.21611/qirt.1996.038, 1996.
Avdelidis, N. P., Hawtin, B. C., and Almond, D. P.: Transient thermography in the assessment of defects of aircraft composites, NDT&E Int., 36, 433–439, https://doi.org/10.1016/S0963-8695(03)00052-5, 2003.
Bagavathiappan, S., Lahiri, B. B., Saravanan, T., Philip, J., and Jayakumar, T.: Infrared thermography for condition monitoring – A review, Infrared Phys. Techn., 60, 35–55, https://doi.org/10.1016/j.infrared.2013.03.006, 2013.
Bishop, Ch. M.: Pattern recognition and machine learning, Springer Science+Business Media LLC, New York, USA, 2006.
Dudzik, S.: Approximation of thermal background applied to defect detection using the methods of active thermography, Metrol. Meas. Syst., 17, 621–636, https://doi.org/10.2478/v10178-010-0051-3, 2010.
Grys, S.: Filtered thermal contrast based technique for testing of material by infrared thermography, Opto-Electron. Rev., 19, 234–241, https://doi.org/10.2478/s11772-011-0009-3, 2011.
Grys, S.: New thermal contrast definition for defect characterisation by active thermography, Measurement, 45, 1885–1892, https://doi.org/10.1016/j.measurement.2012.03.017, 2012.
Grys, S., Vokorokos, L., and Borowik, L.: Size determination of subsurface defect by active thermography – Simulation Research, Infrared Phys. Techn., 62, 147–153, https://doi.org/10.1016/j.infrared.2013.11.011, 2014.
Grys, S., Minkina, W., and Vokorokos, L.: Automated characterisation of subsurface defects by active IR thermographic testing – Discussion of step heating duration and defect depth determination, Infrared Phys. Techn., 68, 84–91, https://doi.org/10.1016/j.infrared.2014.11.005, 2015.
Hagstrand, P. O., Bonjour, F., and Månnson, J. A. E.: The influence of void content on the structural flexural performance of unidirectional glass fibre reinforced polypropylene composites, Compos. Part A-Appl. S., 36, 705-714, 2005.
Huang, H. S. and Talreja, R.: Effects of void geometry on elastic properties of unidirectional fiber reinforced composites, Compos. Sci. Technol., 65, 1964–1981, 2005.
Ibarra-Castanedo, C., Piau, J. M., Guilbert, S., Avdelidis, N. P., Genest, M., Bendada, A., and Maldague, X. P. V.: Comparative study of active thermography techniques for the nondestructive evaluation of honeycomb structures, Res. Nondestruct. Eval., 20, 1–31, https://doi.org/10.1080/09349840802366617, 2009.
Lewinska-Romicka A.: Nondestructive testing. The foundation of defectoscopy, WNT, Warsaw, Poland, 620 pp., 2001 (in Polish).
Manohar, A. and Lanza di Scalea, F.: Determination of defect depth and size using virtual heat sources in pulsed infrared thermography, Exp. Mech., 53, 661–671, https://doi.org/10.1007/s11340-012-9670-9, 2013.
Manyong, C., Kisoo, K., Jeonghak, P., Wontae, K., and Koungsuk, K.: Quantitative determination of a subsurface defect of reference specimen by lock-in infrared thermography, NDT&E Int., 41, 119–124, https://doi.org/10.1016/j.ndteint.2007.08.006, 2008.
Milovanovic, B. and Banjad Pecur I.: Review of active IR thermography for detection and characterization of defects in reinforced concrete, J. Imaging, 2, 11, https://doi.org/10.3390/jimaging2020011, 2016.
Montanini, R.: Quantitative determination of subsurface defects in a reference specimen made of Plexiglas by means of lock-in and pulse phase infrared thermography, Infrared Phys. Techn., 53, 363–371, https://doi.org/10.1016/j.infrared.2010.07.002, 2010.
Osiander, R. and Maclachlan Spicer, J. W.: Time-resolved infrared radiometry with step heating. A review, Rev. Gén. Therm., 37, 680–692, 1998.
Otsu, N.: A threshold selection method from gray-level histograms, IEEE T. Syst. Man Cyb., 9, 62–66, 1979.
Saintey, M. B. and Almond, D. P.: Defect sizing by transient thermography. II: A numerical treatment, J. Phys. D Appl. Phys., 28, 2539–2546, 1995.
Saintey, M. B. and Almond, D. P.: An artificial neural network interpreter for transient thermography image data, NDT&E Int., 30, 291–295, 1997.
Vavilov, V. P.: Thermal/infrared nondestructive testing, NDT handbook series, Spektrum, 5, Moscow, Russia, 1–467, 2009.
Vavilov, V. P. and Shiryaev, V. V.: The method for determining defect size in thermal NDT, Defectoscopy (Russ JNDT), 11, 63–65, 1979 (in Russian).
Venegas, P., Usamentiaga, R., Vega, L., Guerediaga, J., Jorge J., Lopez, I., and Saez de Ocariz, I.: Image and data processing techniques applied to infrared thermographic non-destructive inspections of aeronautical composite components, in: Proceedings of 4th International Symposium on NDT in Aerospace 2012, 13–15 November 2012, Augsburg, Germany, We.2.A.1, 2012.
Wiggenhauser, H.: Active IR applications in civil engineering, Infrared Phys. Techn., 43, 233–238, https://doi.org/10.1016/S1350-4495(02)00145-7, 2002.
Wysocka-Fotek, O., Oliferuk, W., and Maj, M.: Reconstruction of size and depth of simulated defects in austenitic steel plate using pulsed infrared thermography, Infrared Phys. Techn., 55, 363–367, https://doi.org/10.1016/j.ndteint.2007.08.006, 2012.
Zoecke, C., Langmeir, A., and Arnold, W.: Size retrieval of defects in composite material with lock-in thermography, J. Phys. Conf. Ser., 214, 012093, https://doi.org/10.1088/1742-6596/214/1/012093, 2010.


